
FormRelay
Zapier
See the installation steps to learn how to install our app and change the form name
Trigger a Zap when someone submits a Form on your Webflow site.
Before you start
- A Zap starting with the Webhooks by Zapier → Catch Hook trigger. Copy the URL it gives you.
- The URL Zapier gives you is
https://, which is required: plainhttp://URLs are refused when you save the connection. Anything other than a 2xx response is tried again, up to 3 attempts in total, then logged as failed so you can replay it. - Optional: add an API key to the connection and FormRelay sends it as
Authorization: Bearer <key>. Most catch hooks need none. - No field mapping is needed here — the whole submission is sent as JSON, and you pick fields apart inside Zapier.
Send one test submission before you finish building the Zap. Zapier only learns the field names once it has seen a real payload.
- In your App Dashboard, go to the Sites menu and click on your Authorized Webflow Site.
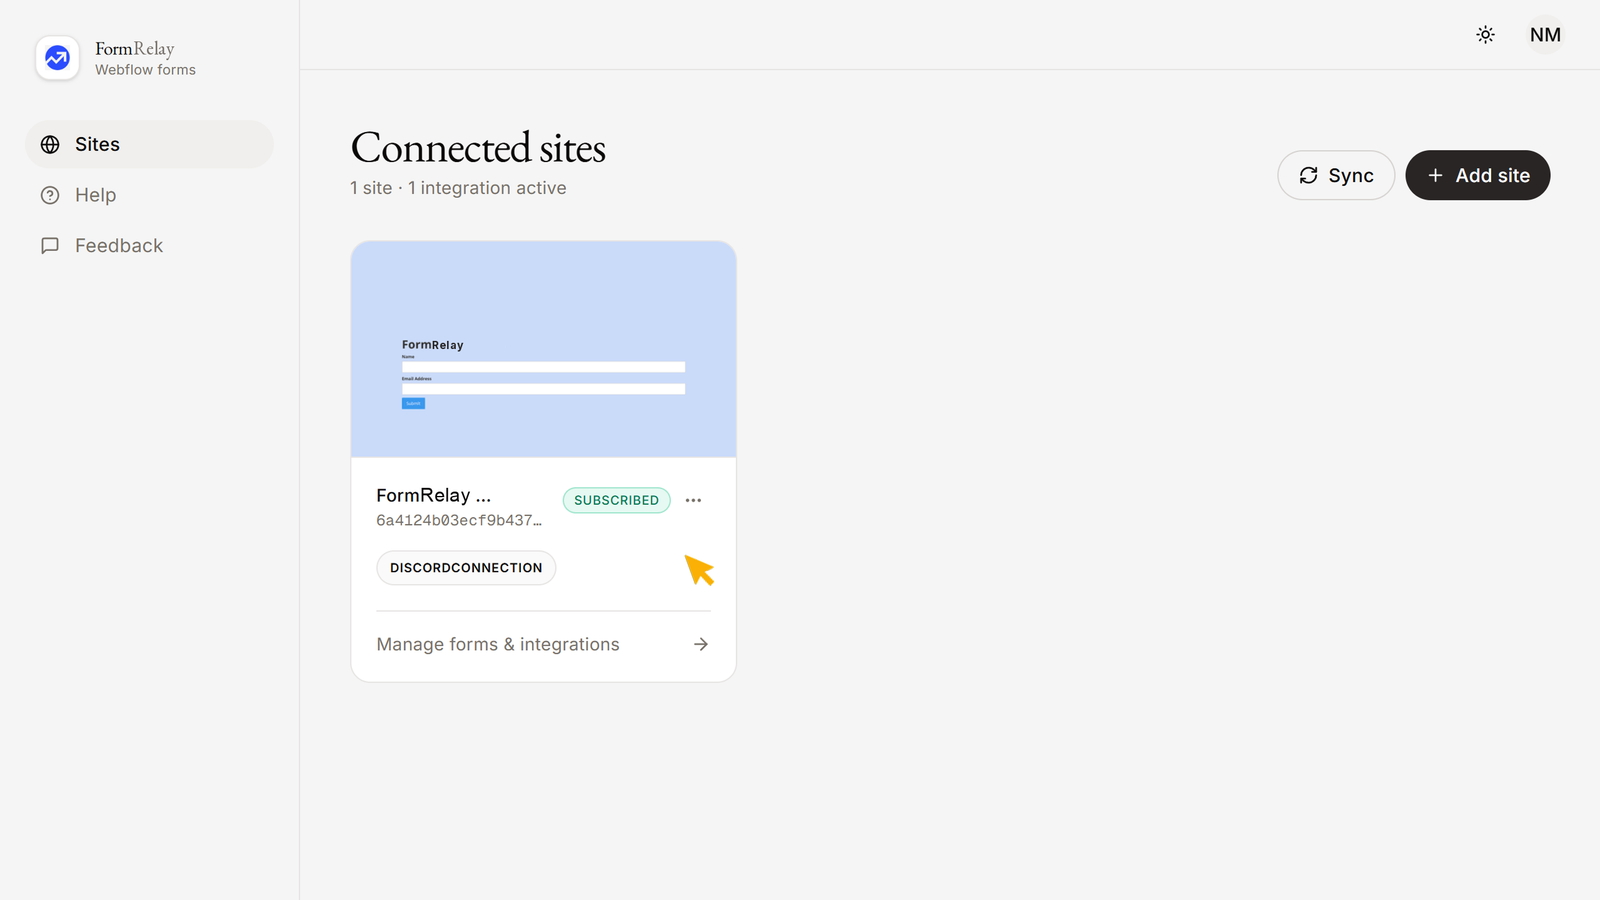
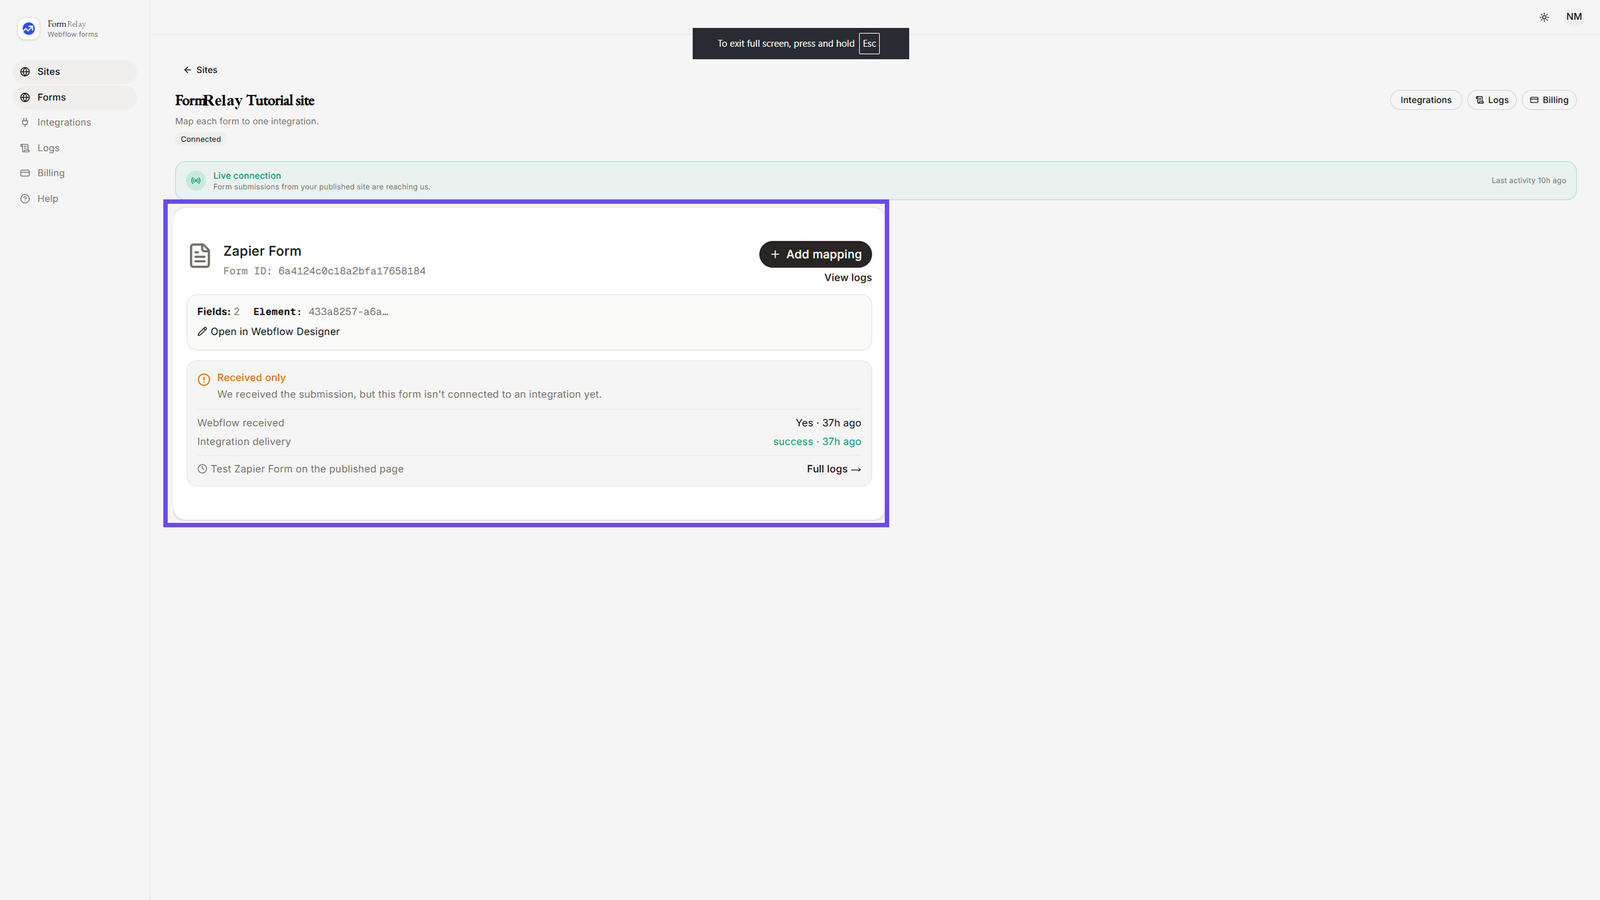
- Here you will see all your forms across the site.
- A form can send to several destinations, but only one of each kind. Adding a second Zapier destination to the same form is not possible; edit the existing one instead.
- From the left-hand menu, click on Integrations. You will see available categories such as:
- Apps & Platforms (Notion, Slack, Discord, Airtable)
- Email & marketing (HubSpot, Mailchimp, Klaviyo, Brevo, MailerLite, EmailOctopus, Moosend, Omnisend, Sender)
- Automation & Webhooks (Webhook, Zapier, Make)
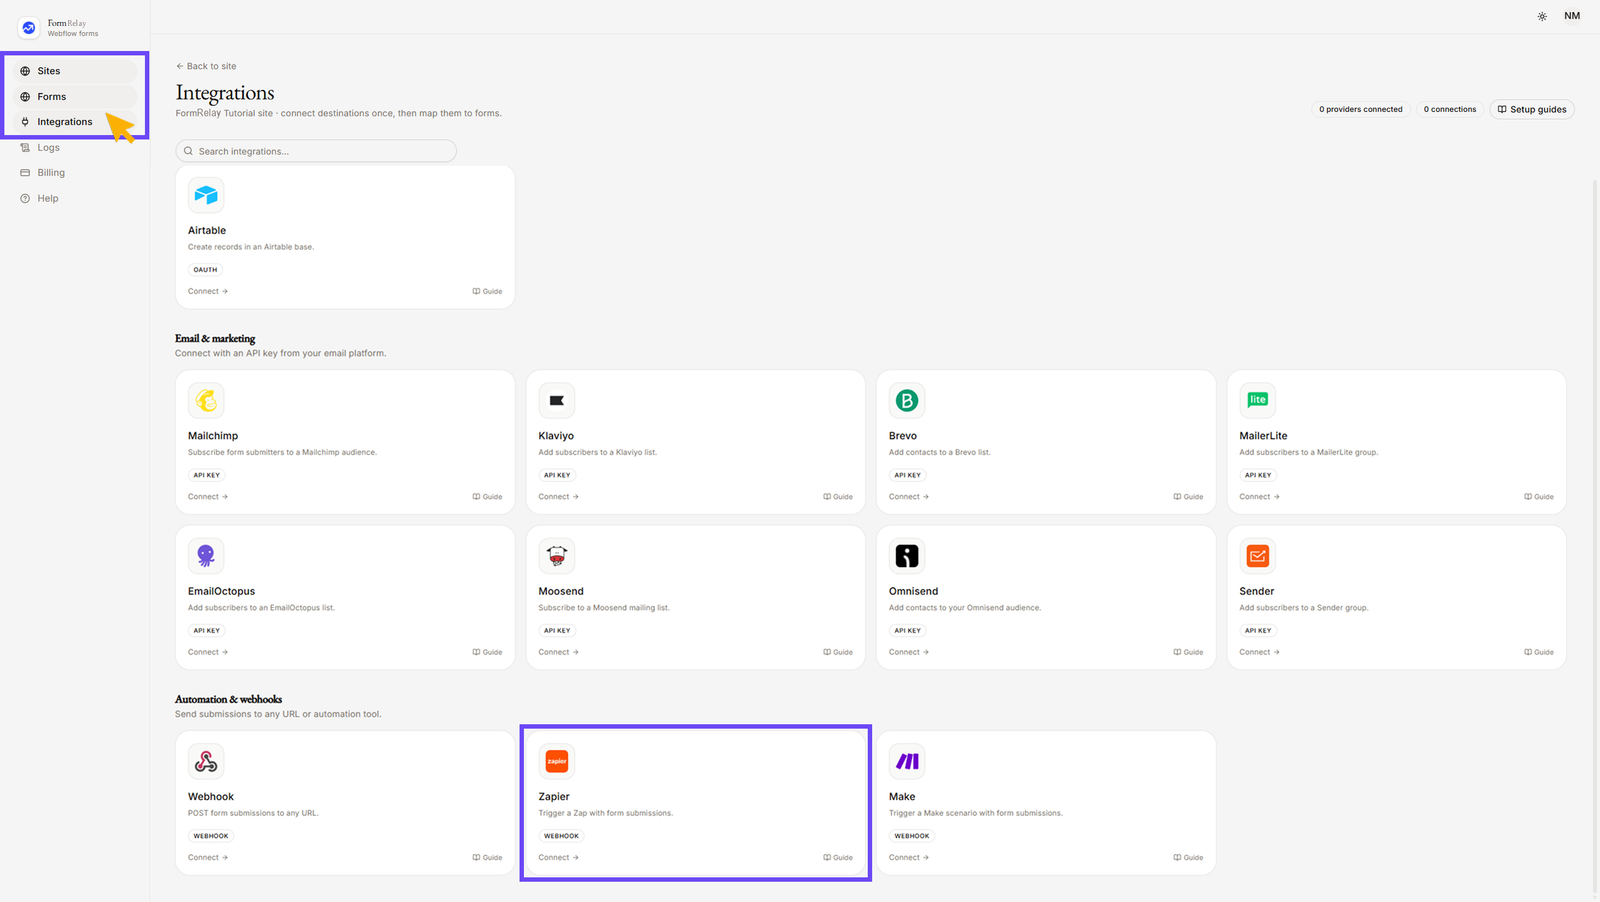
- Under Automation & webhooks, click on Zapier.
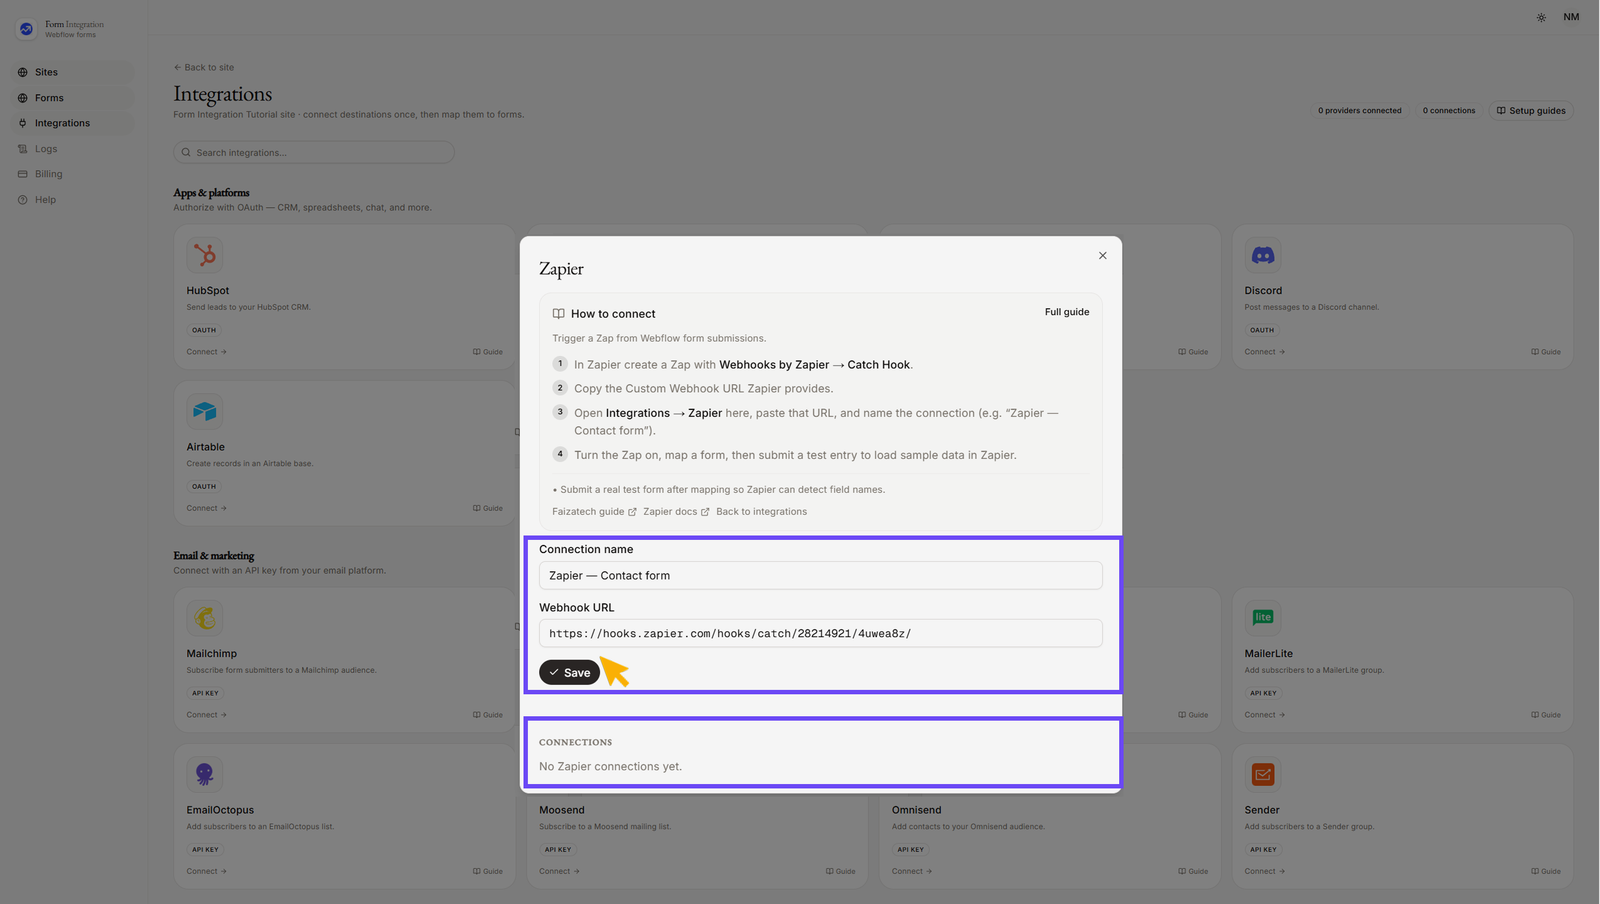
- Give the connection a recognizable name (e.g., “Zapier — Contact form”).
- Paste your Webhook URL — your Zapier Catch Hook URL (e.g. https://hooks.zapier.com/hooks/catch/...).
(For details, see section 4: How to get your Zapier Webhook URL). - click "Save".
- After clicking "Save", your added Zapier integration will appear under "CONNECTIONS".
- You can edit or delete the connection at any time.
- How to get your Zapier Webhook URL.
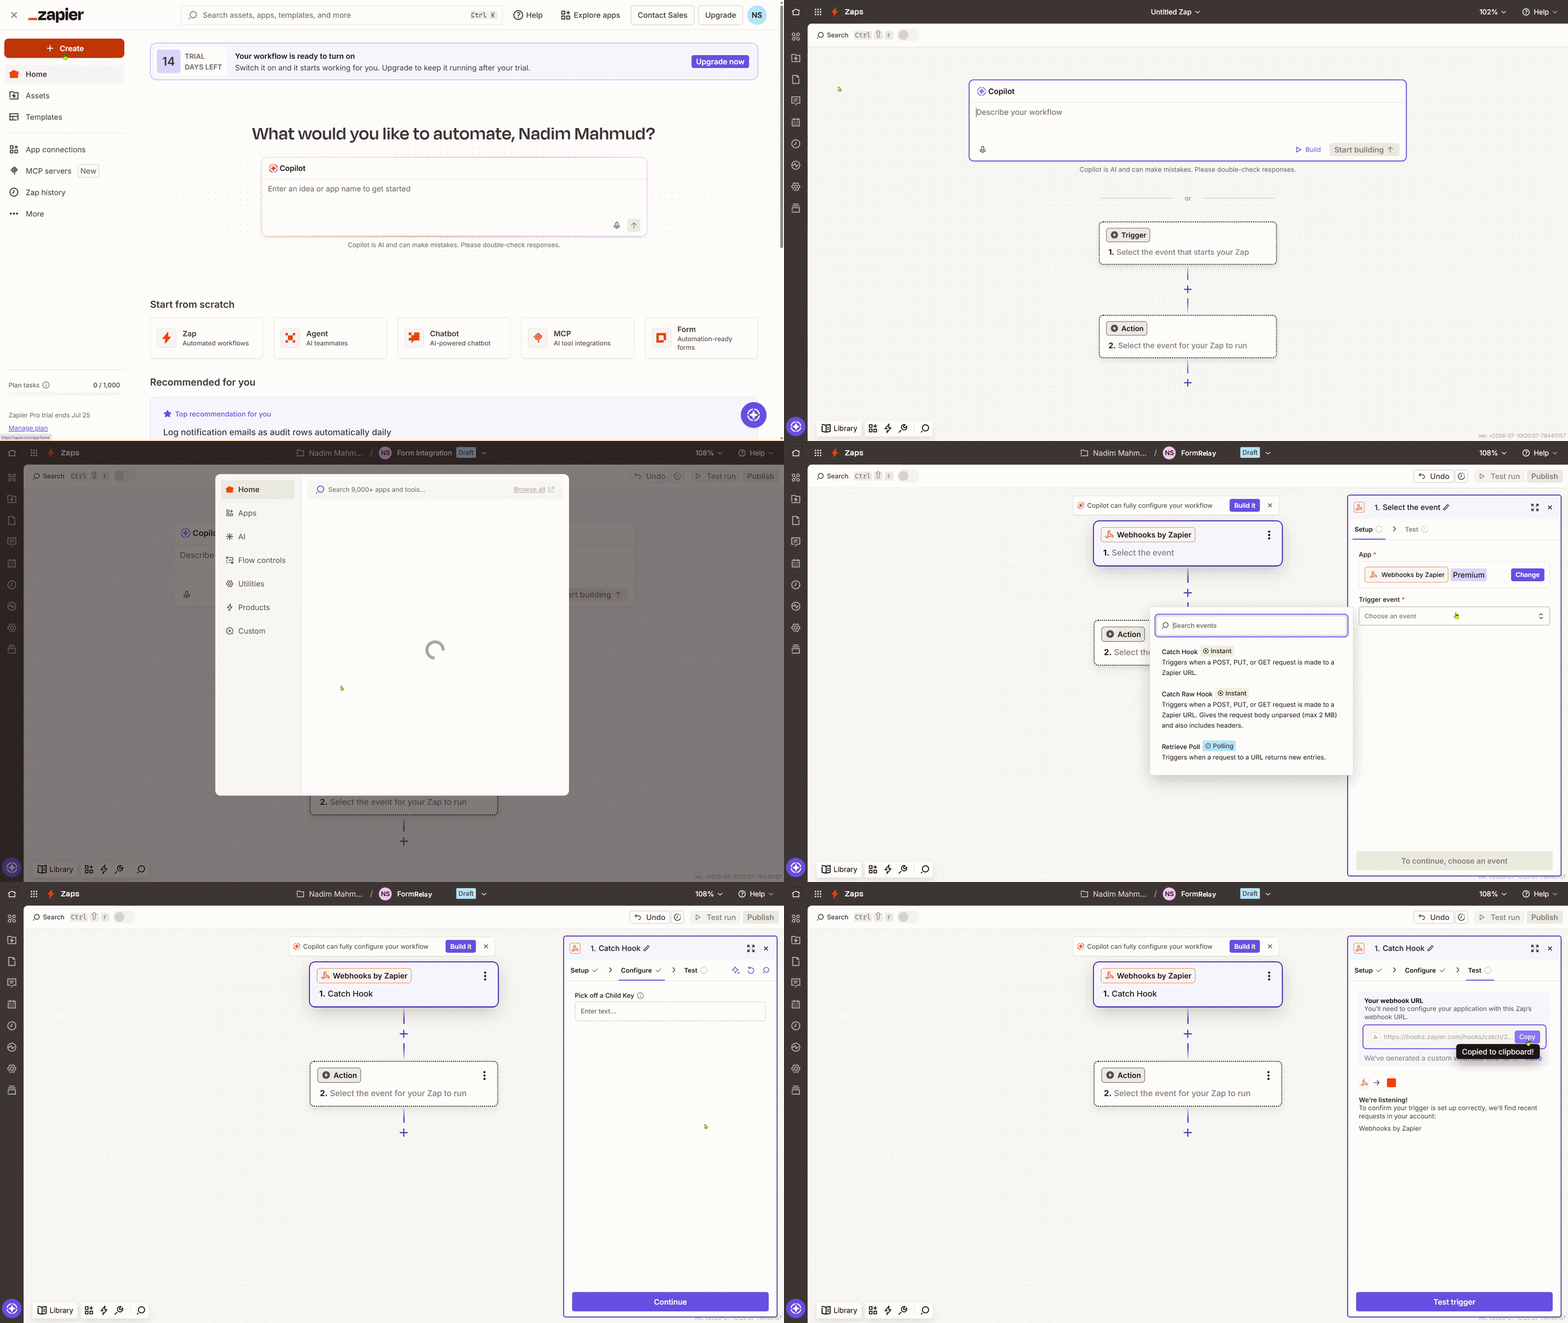
- Go to your "Zapier Dashboard", you can either create your own account with a subscription or test the free version.
- In there click "+ Create" (or Zap), give the zaps a recognizable name.
- For the Trigger, search for and select Webhooks you will get it under "Popular built-in tools", then "click" on it.
- Choose Catch Hook as the "trigger event", then click Continue.
- On the Pick off a Child Key step, you can leave it blank and click Continue (you can configure this later if needed).
- Zapier will generate a unique Custom Webhook URL — copy this URL.
- Paste it into the Webhook URL field in the FormRelay app -> Integrations -> Zapier.
- Keep the Zap editor open (do not publish yet) — you will send a test submission from your Form to complete the Zap setup.
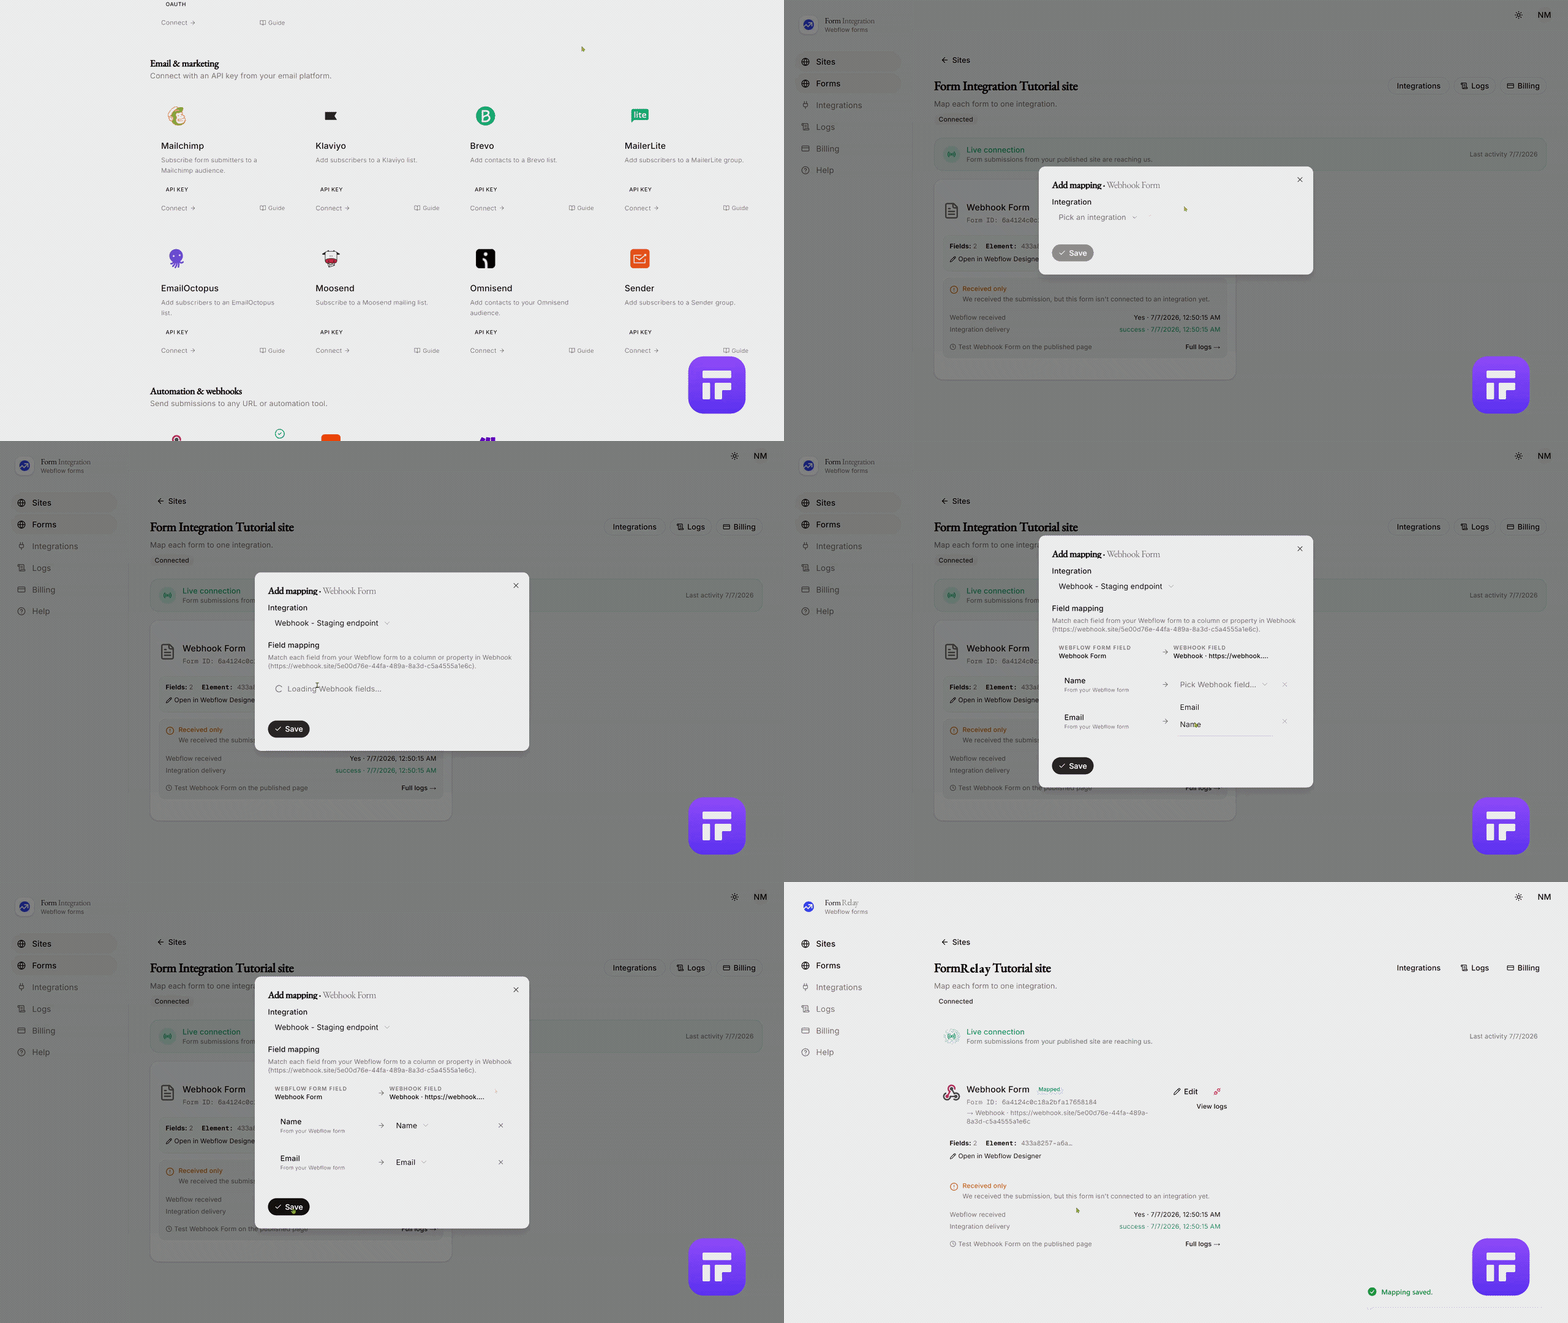
- Go back to the Forms menu.
- Choose a Form from your authorized Webflow site.
- Click "+ Add destination".
- A popup will open with a dropdown for Integration → Pick an integration.
- Select your Zapier integration from the dropdown.
- There is nothing to map: the whole submission is sent as JSON, with the field names Webflow uses.
- Click Save when finished.
- Test the integration:
- Go to your published Webflow site.
- Fill out and submit the form.
- You will see the data appear in your Webhook Dashboard within a few seconds.
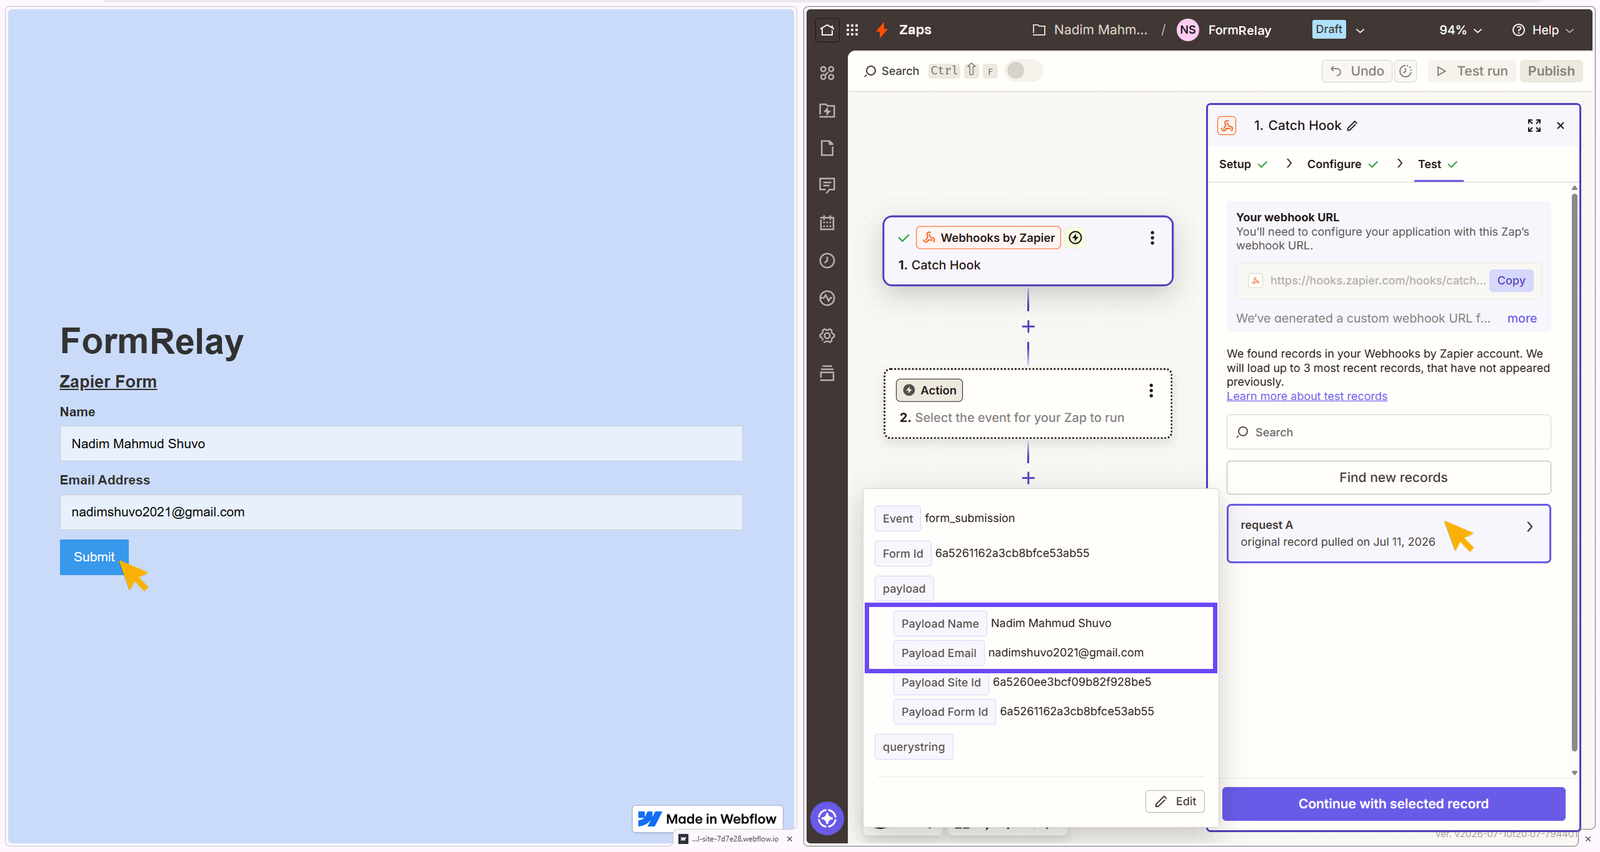
✅ Your Zapier integration is now successfully set up and ready to sync form submissions.
Payload reference
Live form submission (sent on every real submit):
{
    "event": "form_submission",
    "formId": "<webflow-form-id>",
    "payload": {
        "Name": "Jane Doe",
        "Email": "jane@example.com",
        "siteId": "<webflow-site-id>",
        "formId": "<webflow-form-id>"
    }
}
- Sent as
POSTwithContent-Type: application/json. - Field keys in
payloaduse Webflow field display names.
The play icon on the saved connection sends a test payload (the same shape as the Webhook test payload, with the header
x-formrelay-test: 1). That is enough for Zapier to learn the field names; a real submission from your published site works too.
Troubleshooting
| Issue | What to do |
|---|---|
| Subscribe to enable form delivery | Subscribe the site (7-day free trial) on its Billing page; mappings you save before that go live once the site is subscribed. |
| Not linked yet / Needs attention on the site page | Click Fix connection to register the Webflow → FormRelay webhook again. |
| No integrations yet — add one from the Integrations page first. | Add a Zapier connection under Integrations before mapping. |
| Zap does not trigger | Submit the form on your published site, then click Test trigger in the Zap editor. |
| Logs show failed for Zapier | Verify the Zapier Catch Hook URL is correct and the Zap is saved. |
Still stuck?
Open the site's Logs page in FormRelay. Every attempt is recorded with the destination's own error message, and you can Replay a failed delivery once the cause is fixed. Delivery & Retries explains what the statuses mean.